How to set up Voicemail
How do I configure voicemail? When you can’t answer the phone or decline a call, voicemail is a telecommunications service that enables callers to leave recorded voice messages for you. If you don’t answer or reject a call from someone, the call is automatically forwarded to your voicemail box. After that, the caller has the option to leave a message, which is then captured and saved in your voicemail system. Landline and mobile phone providers frequently include voicemail as a feature of their phone services. When you’re not available or unable to answer the phone, it offers a convenient option for people to leave messages for you. Calling your voicemail number, using a specific voicemail app, or using a voicemail service offered by your carrier are all ways to access your voicemail messages.
You typically need to enter a password or PIN in order to get your voicemail messages, ensuring that only you have access to them. Depending on the particular capabilities offered by your voicemail service, you can listen to the messages, save them, delete them, or take other actions after accessing your voicemail.
When you’re not available to answer the phone, voicemail can help you manage missed calls and make sure that you receive critical messages.
How to configure iPhone voicemail
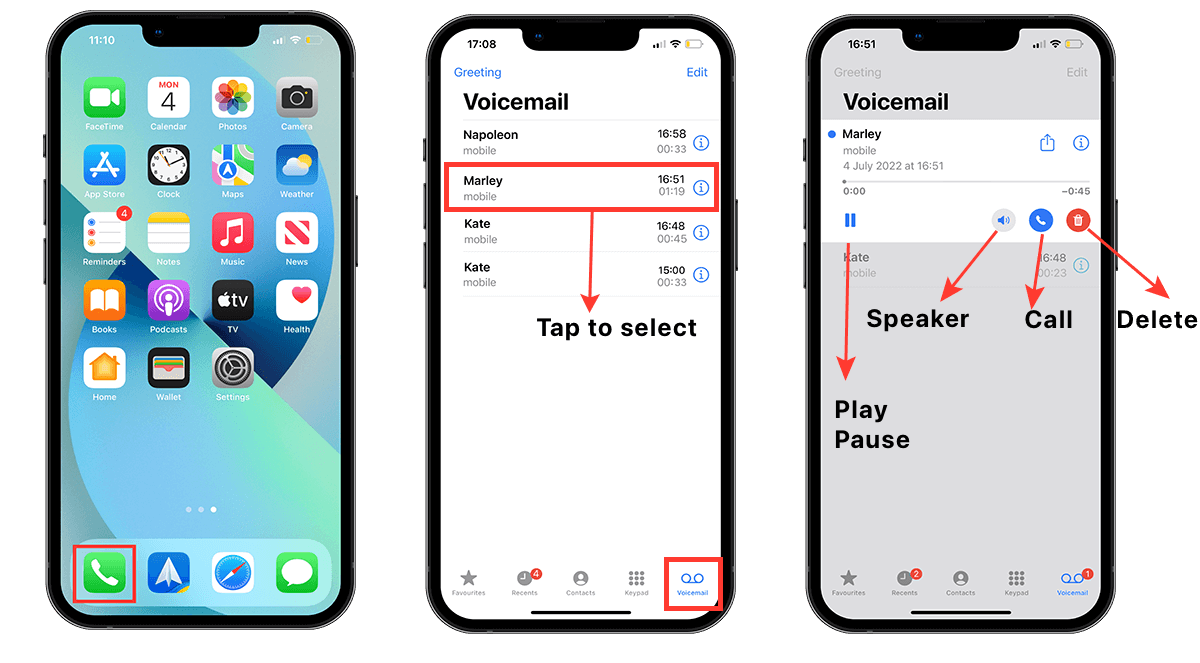
The steps below to set up voicemail on an iPhone:
- From the iPhone’s home screen, launch the Phone app.
- In the Phone app’s bottom right corner, select the “Voicemail” menu.
- You will be asked to create a voicemail password if this is your first time setting up voicemail. You might need to input your current voicemail password if you’ve already set up voicemail. Your voicemail messages can be accessed using this password.
- To make a personalized voicemail greeting or to use the pre-recorded message, follow the on-screen instructions. Before leaving a message, callers will hear the greeting.
- You can start receiving voicemail messages after putting up your voicemail greeting. Go to the Voicemail tab in the Phone app and choose the voicemail you want to hear to listen to your voicemails.
Acceptable hardware or software:
- iPhone (2007): The original iPhone model released by Apple, also referred to as the iPhone 2G or iPhone Original.
- The iPhone 3G, released in 2008, was the second edition of the device and featured GPS and 3G cellular connectivity.
- iPhone 3GS (2009): The third-generation iPhone features voice control, better performance, and video recording options.
- iPhone 4 (2010): The iPhone 4 introduced a high-resolution Retina display and a front-facing camera in a redesigned design with glass on the front and back.
- iPhone 4s (2011): The fifth-generation iPhone that had enhanced photography capabilities and Siri, Apple’s virtual assistant.
- iPhone 5 (2012): The iPhone 5 debuted the Lightning connector and had a bigger 4-inch display with a better processor.
- iPhone 5c (2013): A colorful, more cost-effective iPhone model that shares many of the same features as the iPhone 5.
- iPhone 5s (2013): The iPhone 5s introduced Touch ID, a fingerprint recognition function, along with better camera and processing capabilities.
- The 2014 iPhone 6 and iPhone 6 Plus have larger displays (4. 7 inches and 5. 5 inches, respectively), a fresh look, better cameras, and faster performance.
- The iPhone 6s and iPhone 6s Plus (2015): These devices introduced 3D Touch, a pressure-sensitive display technology, and enhanced cameras and performance.
- iPhone SE (2016): A portable iPhone variant with an exterior resembling the iPhone 5s but newer internal components.
- iPhone 7 and iPhone 7 Plus (2016): These models dropped the headphone port and included water resistance as well as stereo speakers.
- iPhone 8 and iPhone 8 Plus (2017): With wireless charging and enhanced camera features, these versions resembled the iPhone 7 in terms of appearance.
- iPhone X (2017): The iPhone X celebrated the tenth anniversary of the iPhone with an edge-to-edge display, Face ID facial recognition, and a brand-new gesture-based user experience.
- The A12 Bionic chip, better cameras, and larger display options debuted with the iPhone XR, iPhone XS, and iPhone XS Max (2018) models.
- The 2019 editions of the iPhone 11, iPhone 11 Pro, and iPhone 11 Pro Max had upgraded cameras, Night Mode, and the A13 Bionic processor.
- iPhone SE (2020): An updated iPhone SE that features the A13 Bionic chip, an iPhone 8-inspired design, and enhanced internals.
- The 2020 models of the iPhone 12, iPhone 12 mini, iPhone 12 Pro, and iPhone 12 Pro Max: These models debuted the A14 Bionic chip, a redesigned flat-edge design, 5G connectivity, and enhanced cameras.
- The 2021 release of the iPhone 13, iPhone 13 mini, iPhone 13 Pro, and iPhone 13 Pro Max Smaller notches, ProMotion display technology on the Pro models, enhanced camera systems, and the A15 Bionic chip were all features of these models.
How to configure Android voicemail
Depending on the manufacturer and the Android operating system version, the method for setting up voicemail on an Android device may differ slightly. However, the following general instructions will help you set up voicemail on an Android device:
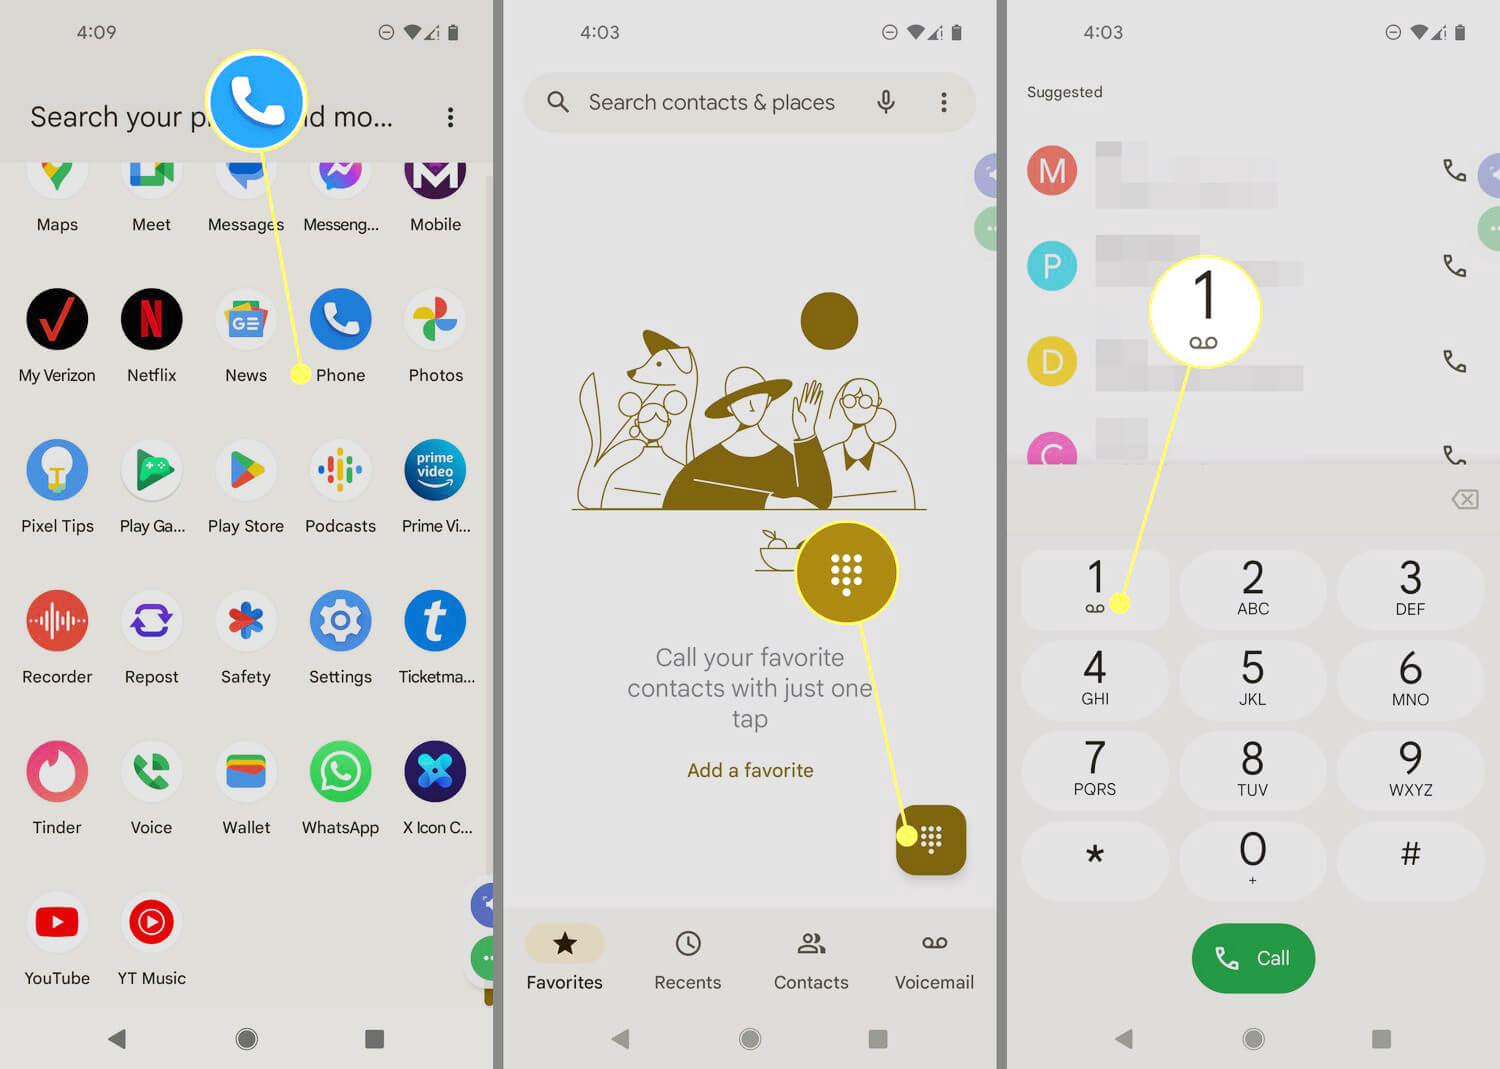
- Start your Android device’s Phone app. The Phone app’s icon typically looks like a phone receiver or keypad.
- Check the top right or bottom right corner of the Phone app for the menu icon, which is frequently depicted by three dots, three lines, or an ellipsis. Click this menu button.
- Locate “Settings” or “Call settings” in the list of menu options that appears, and touch on it.
- Look for the “Voicemail” or “Voicemail settings” option in the settings. The precise name may vary depending on your device.
- Click “Voicemail” or “Voicemail settings” to open the voicemail configuration menu.
- You could come across choices like “Set Up, ” “Voicemail number, ” or “Voicemail service. ” Tap the relevant selection.
- A voicemail number entry or confirmation popup will appear. Your mobile service provider normally provides this number. You can ask your service provider for help if you’re unclear of the voicemail number.
- Follow any further on-screen instructions to finish voicemail setting. Creating a voicemail PIN or password or recording a voicemail greeting may fall under this category.
- After setting up your voicemail, you may access it by opening the Phone app, choosing the voicemail tab or icon, and then following the on-screen directions.
Acceptable hardware or software:
- iPhone (2007): The original iPhone model released by Apple, also referred to as the iPhone 2G or iPhone Original.
- The iPhone 3G, released in 2008, was the second edition of the device and featured GPS and 3G cellular connectivity.
- iPhone 3GS (2009): The third-generation iPhone features voice control, better performance, and video recording options.
- iPhone 4 (2010): The iPhone 4 introduced a high-resolution Retina display and a front-facing camera in a redesigned design with glass on the front and back.
- iPhone 4s (2011): The fifth-generation iPhone that had enhanced photography capabilities and Siri, Apple’s virtual assistant.
- iPhone 5 (2012): The iPhone 5 debuted the Lightning connector and had a bigger 4-inch display with a better processor.
- iPhone 5c (2013): A colorful, more cost-effective iPhone model that shares many of the same features as the iPhone 5.
- iPhone 5s (2013): The iPhone 5s introduced Touch ID, a fingerprint recognition function, along with better camera and processing capabilities.
- The 2014 iPhone 6 and iPhone 6 Plus have larger displays (4. 7 inches and 5. 5 inches, respectively), a fresh look, better cameras, and faster performance.
- The iPhone 6s and iPhone 6s Plus (2015): These devices introduced 3D Touch, a pressure-sensitive display technology, and enhanced cameras and performance.
- iPhone SE (2016): A portable iPhone variant with an exterior resembling the iPhone 5s but newer internal components.
- iPhone 7 and iPhone 7 Plus (2016): These models dropped the headphone port and included water resistance as well as stereo speakers.
- iPhone 8 and iPhone 8 Plus (2017): With wireless charging and enhanced camera features, these versions resembled the iPhone 7 in terms of appearance.
- iPhone X (2017): The iPhone X celebrated the tenth anniversary of the iPhone with an edge-to-edge display, Face ID facial recognition, and a brand-new gesture-based user experience.
- The A12 Bionic chip, better cameras, and larger display options debuted with the iPhone XR, iPhone XS, and iPhone XS Max (2018) models.
- The 2019 editions of the iPhone 11, iPhone 11 Pro, and iPhone 11 Pro Max had upgraded cameras, Night Mode, and the A13 Bionic processor.
- iPhone SE (2020): An updated iPhone SE that features the A13 Bionic chip, an iPhone 8-inspired design, and enhanced internals.
- The 2020 models of the iPhone 12, iPhone 12 mini, iPhone 12 Pro, and iPhone 12 Pro Max: These models debuted the A14 Bionic chip, a redesigned flat-edge design, 5G connectivity, and enhanced cameras.
- The 2021 release of the iPhone 13, iPhone 13 mini, iPhone 13 Pro, and iPhone 13 Pro Max Smaller notches, ProMotion display technology on the Pro models, enhanced camera systems, and the A15 Bionic chip were all features of these models.
How to configure Android voicemail
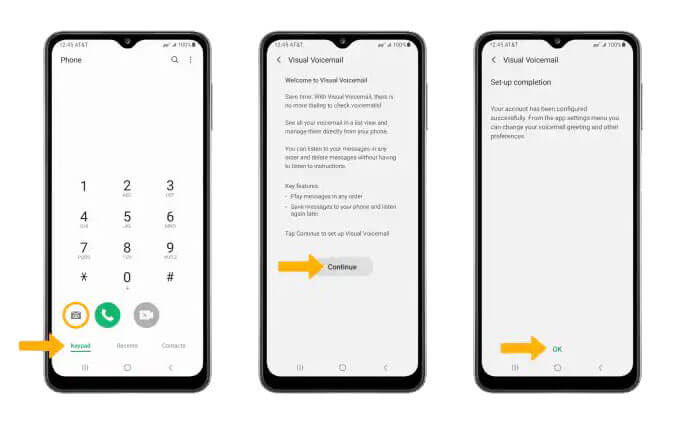
To set up voicemail on a Samsung device, you can follow these steps:
- Open the Phone app on your Android device. The icon for the Phone app usually resembles a phone receiver or keypad.
- Look for the menu icon, which is often represented by three dots, three lines, or an ellipsis, located at the top right corner or bottom right corner of the Phone app. Tap on this menu icon.
- Locate “Settings” or “Call settings” in the list of menu options that appears, and touch on it.
- Look for the “Voicemail” or “Voicemail settings” option in the settings. The precise name may vary depending on your device.
- Click “Voicemail” or “Voicemail settings” to open the voicemail configuration menu.
- You could come across choices like “Set Up, ” “Voicemail number, ” or “Voicemail service. ” Tap the relevant selection.
- A voicemail number entry or confirmation popup will appear. Your mobile service provider normally provides this number. You can ask your service provider for help if you’re unclear of the voicemail number.
- Follow any further on-screen instructions to finish voicemail setting. Creating a voicemail PIN or password or recording a voicemail greeting may fall under this category.
- After setting up your voicemail, you may access it by opening the Phone app, choosing the voicemail tab or icon, and then following the on-screen directions.
The process of setting up voicemail on an Android device can vary slightly depending on the manufacturer and the version of the Android operating system. However, here is a general guide to setting up voicemail on an Android device:
Compatible Devices:
- Samsung Galaxy S series: The Galaxy S21, S21+, S21 Ultra, S20, S20+, S20 Ultra, S10, S10+, S10e, and older devices are all part of this flagship series.
- Samsung Galaxy Note series: The Galaxy Note series, which includes models including the Galaxy Note 20, Note 20 Ultra, Note 10, Note 10+, Note 9, and prior iterations, is renowned for its bigger screens and productivity capabilities.
- Samsung Galaxy A series: The Galaxy A52, A72, A51, A71, A50, A20, and more models are available in this mid-range series.
- The Samsung Galaxy J series, which features devices like the Galaxy J7, J5, J3, and prior iterations, is an entry-level and cost-effective series.
- Samsung Galaxy M series: This budget-friendly series features the Galaxy M31, M21, M11, among other variants.
- Samsung Galaxy Z series: The voicemail feature is available on Samsung’s line of foldable smartphones, which includes the Galaxy Z Fold and Galaxy Z Flip.
How to configure AT&T voicemail
You can use these steps to set up voicemail with AT&T:
- Use your AT&T mobile device to call your AT&T voicemail number. Your personal phone number is normally the voicemail number, but you can also check AT&T’s website or get in touch with their customer care to make sure.
- Press the * key on your phone to pause the voicemail greeting when it begins to play.
- A voicemail password entry screen will appear. It’s possible that you’ll need to make a new password if you’re setting up voicemail for the first time. In order to enter or create a password of your choice, follow the instructions provided.
- You will receive instructions on how to set up your voicemail after entering or generating your password. Typically, this entails setting up your name announcement, recording a customized voicemail greeting, and selecting extra voicemail choices.
- Comply with the instructions to record your own customized voicemail message. You have the option of recording a personalized greeting or using the preset one.
- You can end the conversation once you’ve completed configuring your voicemail.
- To listen to your voicemail messages in the future, just call the number for your voicemail on your AT&T mobile device, enter your voicemail password when requested, and follow the on-screen instructions.
How to configure T-Mobile voicemail
On a T-Mobile handset, you can set up voicemail by doing the following steps:
- Call the T-Mobile voicemail set up number. Usually, T-Mobile includes this number in its welcome package, but you can also get in touch with them by phone. Usually, the number is 123 or *123#.
- Select your desired language for the voicemail system by following the prompts.
- When prompted, enter a 4- to 15-digit password to set up a voicemail password. Confirm the password by following the directions.
- When requested, provide a personalized voicemail message. You have the option of recording a personalized greeting or using the preset one.
- You can hang up the phone once you’ve completed configuring your voicemail.
- Call the voicemail number T-Mobile has provided to access your voicemail in the future. Typically, this is your personal phone number, although your particular T-Mobile plan may make a difference. To call directly to voicemail on your phone, press and hold the “1” key on the dial pad.
- When prompted, enter your voicemail password.
- Use the voicemail system as directed to listen to messages, delete messages, modify voicemail settings, and carry out other operations.
How to configure Cricket’s voicemail
You can follow these steps to set up voicemail on a Cricket Wireless device:
- Call the Cricket Wireless voicemail setup number. Your own phone number is often the voicemail setup number.
- Select your desired language for the voicemail system by following the prompts.
- When prompted, enter a 4- to 15-digit password to set up a voicemail password. Confirm the password by following the directions.
- When requested, provide a personalized voicemail message. You have the option of recording a personalized greeting or using the preset one.
- You can hang up the phone once you’ve completed configuring your voicemail.
- You can call Cricket Wireless’ voicemail number in the future to access your voicemail. Usually, your own phone number appears on the voicemail.
- When prompted, enter your voicemail password.
- Use the voicemail system as directed to listen to messages, delete messages, modify voicemail settings, and carry out other operations.