
R-Studio is one of the fastest data recovery programs for bringing back deleted files, pictures, and videos from formatted hard drives, USB drives, or scanned disks. On this page, I will explain what the program does, how to use it, and its main features. I am adding a link to the official website for anyone who wants to download the program. You can easily download the setup file there first and then keep reading. Finding the fastest and most reliable data recovery program matters. But I have not seen any program deliver 100 percent success. I have tried many over the years. In my tests, R-Studio has been the most successful. It cannot always bring back every file. Compared with other popular programs like Recuva, Disk Drill, and Stellar, R-Studio gives better results. It also stands out as the fastest scanner among them.
So I recommend you get to know this program and learn the details of how to use it as one of the most effective ways to recover your lost files. Below, you can review all the steps for data recovery and the different options the program offers. This article also gives you an evaluation of R-Studio’s pros, cons, and advantages. I prepared this guide with formatting structure and differences from other programs in mind. I hope it helps you.
How to download R-Studio?
First, I recommend you download a legal program. Programs changed through other methods can harm your computer. So I am helping you download the setup file from the official website. When you click the link, you will see many download options. The page has separate buttons for Windows, Mac, and Linux. Just choose the one that matches your operating system and download it.
The page also has buttons to buy the full version. You can download the full version instead of the demo version and use all the program’s features. The full version costs around $180. In the US, this price is close to the market average for professional data recovery software. If it gives you a chance to recover important files, you may find it worth paying.
If you want to use the R-Studio file recovery program to recover data on your computer, you need to download it first. You must visit the official website to download it. We will give you a link for that. When you click the link, the official website will open. You can download the setup file to your computer with the download button on the page. Downloading the program is free.
Features
| Category | Feature | Description / Notes |
|---|---|---|
| General Information | Version | 9.5 build 191810 |
| File Size | Approximately 69 MB | |
| Release Date | June 20, 2026 | |
| Supported Operating Systems | Windows (Desktop) | Windows 11, 10, 8.1, 8, 7, Vista, XP, 2000 |
| System Requirements | Processor | Intel-compatible 64-bit processor or Apple M1/M2 chip |
| Memory (RAM) | At least 256 MB (all physical RAM available on 64-bit systems) | |
| Supported File Systems | Windows | FAT12/16/32, exFAT, NTFS, NTFS5, ReFS/ReFS2+ (including deduplication support for Windows Server 2019) |
| Other | ISO9660 (CD/DVD/Images), UStar/Tar/CPIO/Pax (magnetic tapes) | |
| Core Features | Data Recovery | Recover files from local disks and remote computers over a network |
| Damaged Partitions | Recover data from disks with corrupted partition structures | |
| Intelligent Scan | Fast and flexible scanning with the proprietary IntelligentScan technology | |
| Known File Types | Search based on known file types (RAW recovery) | |
| Batch Recovery | Recover multiple files at the same time | |
| Recovery Chance Estimation | Prediction of the probability of successful recovery | |
| Recovery Lists | Export recovery lists, edit them manually, and re-import them | |
| Multitasking | Perform different tasks simultaneously (Technician version only) | |
| Advanced Features | BitLocker Support | Decrypt BitLocker and BitLocker ToGo volumes (using password, recovery key, or .bek file) |
| Disk Imaging | Mount and create VHD/VHDX/VDI disk image formats | |
| Runtime Imaging | Create a disk image of a running system (Technician version only) | |
| Hide Devices | Hide specific devices to exclude them from scanning | |
| Emergency Tools | Emergency GUI / TUI | Bootable versions that can be run from removable media on unbootable computers |
| Demo Version | Limitation | Cannot recover files larger than 1024 KB; however, you can preview files |
Pros
- R-Studio scans multiple disks at once and saves you time.
- The program recovers data from formatted hard drives and flash drives. You can bring back deleted files.
- R-Studio runs on all operating systems.
- You can recover files deleted from the Recycle Bin.
- Scanning goes much faster than with other programs.
Cons
- The full version is pretty pricey around $180.
- The interface is a bit of a mess can be really confusing to use.
- It can be a real challenge figuring out which files to recover.
- Not every file is recoverable … sorry to say it but that is just the way it is.
- Can only scan the data, you will need to shell out for the paid version to actually recover anything.
As you can see, this list shows it is a major option for data recovery with broad features and strong scan performance. So compare the pros and cons and decide whether it fits your needs. Before that, I recommend you check the system requirements too.
Supported OS
You can install the latest version of R-Studio on all devices except Android or iPhone phones. That means you can run it on these operating systems:
- Windows: 11, 10, 8.1, 7 (32-bit & 64 bit).
- Mac OS.
- Linux: Ubuntu, Debian, Fedora.
You can also install it on desktop or laptop computers with Windows Server. After you install the program, you can also recover data from photo cameras or video cameras.
What does R-Studio do?
The program recovers data deleted from your computer’s hard drive. Even if you formatted your computer, you can bring back old files. R-Studio is a capable program built to help you do these tasks easily. People who hear about the program for the first time ask what kind of program it is. Let me explain. People know R-Studio as a file recovery program, but it gives much better results than other programs. So it is usually the first choice when you need data recovery.
Sometimes you can bring back deleted files on your computer with System Restore. But if you formatted the hard drive, System Restore does not work. In these cases, you need to use a data recovery program. In my view, R-Studio is the best option.
In short:
- It recovers deleted files.
- It brings back data and files from formatted hard drives.
- It brings back data from formatted memory cards.
How to Recover Files with R-Studio
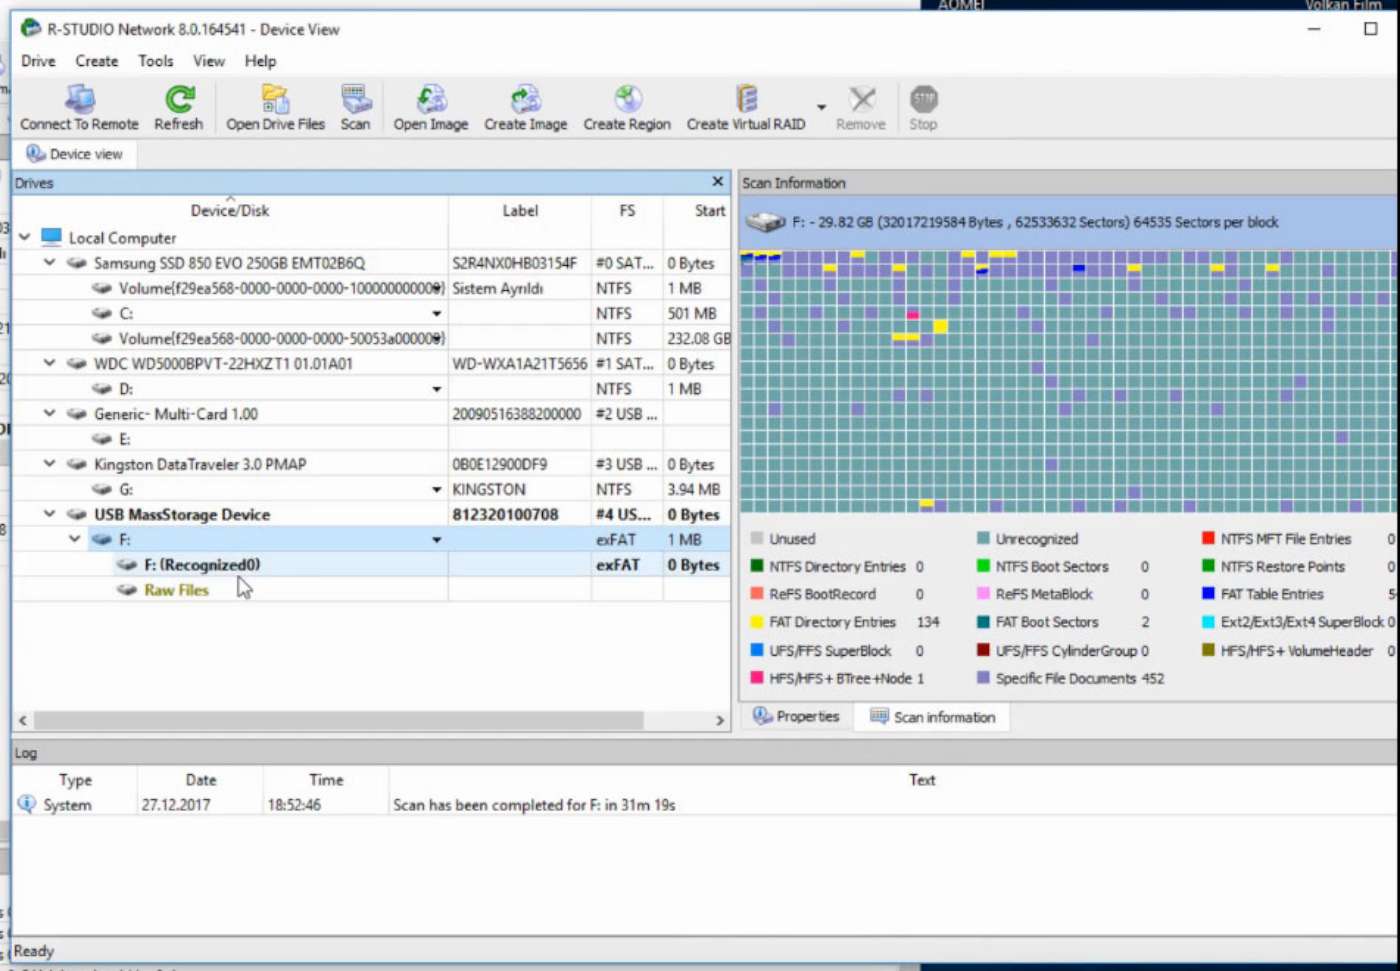
When you open the program, you see a window that lists all the disks on your computer. When you select the disk you want to recover from, a new screen opens to start the scan. When you click the SCAN button, the program starts a long scan on your disk to find deleted data. When the scan finishes, the program shows old deleted files from your computer on the right side of the window. These files sit in folders marked with a red X. To recover deleted files, just select these folders and click the RECOVER button.
Can R-Studio Recover all files 100%?
Sadly, if the partitions on the hard drive are damaged, the data you recover may not work properly. R-Studio and similar programs are a good option for recovering data from formatted disks. But they cannot always bring back every file in perfect condition. So the “100 percent file recovery” promise you see online does not reflect reality.
Based on my own experience, I have recovered many files, but I could not bring some back. Small files, such as TXT files, usually recover with less damage. Large files, especially videos, can lower your recovery chances. The way the disk was formatted is also a major factor that affects your chance of file recovery.
If you used Quick Format during formatting, your chance of file recovery is higher. If you chose Slow Format, file recovery can come down to luck.
Formatting Tips
I recommend you use Quick Format when you format. Quick Format causes less fragmentation on the disk, and that makes data recovery easier. But remember, recovering data from a formatted hard drive is not always easy.
Warning!
If you save new data to a formatted hard drive, bringing back old deleted data becomes much harder. The more often you repeat the formatting process, the lower your recovery chance. So I recommend you start the scan to recover your deleted files right after you format.
How to use R-Studio?
Before you use the program, read a written guide or watch videos that show how to use it on YouTube to learn how it works. This program may not be easy for new users. If you formatted your hard drive and want to recover data you thought was gone for good, R-Studio can be a solution. After you run the program, move your cursor over one of the hard drives listed in the interface and right click. Then click the SCAN button in the menu to start the scan. The scan screen has many settings, but you do not need to touch most of them. You must change the Save to File setting.
To change this setting, check the Save to File box and use the Browse button to choose a location where the scan results will be saved. This creates a recovery template. This template is very important because it keeps you from having to restart the process if a problem happens during the scan. It lets you continue an unfinished scan from where it stopped.
After this step, check the Detailed option to recover more data during the scan. This option scans data in detail and can raise recovery success up to 90 percent.
How to Improve Data Recovery Success
If you choose the Simple option, data recovery success can drop to 45 percent. Simple only does a surface scan and finishes quickly. The Detailed option scans deeper and recovers more data. Detailed scanning takes longer, but ignore the time and use this setting to recover all your data.
In short, if you want the highest possible recovery rate for deleted data, always choose the Detailed option.
Starting the Scan
After you finish all settings, click the SCAN button and wait for the scan to finish. This process can take some time, but you must be patient to recover your data successfully.
Interface and Functions
- The window on the left side of the screen shows the disks you can recover from.
- The window on the right side shows the progress of the scan and the status of recovered files.
Structural Units
R-Studio examines the following structural units during the scan:
- NTFS Boot Sectors
- FAT Table Entries
- UFS/FFS SuperBlock
- Specific File Documents
- NTFS Restore Points
- FAT Directory Entries
- UFS/FFS CylinderGroup
- NTFS MFT File Entries
- ReFS BootRecord
- FAT Boot Sectors
- HFS/HFS+ VolumeHeader
- NTFS Directory Entries
- ReFS MetaBlock
- Ext2/Ext3/Ext4 SuperBlock
- HFS/HFS+ BTree+Node
After the Scan
When the scan finishes, the program creates two disk sections.
Recognized0:
This folder shows the folders from the hard drive before deletion. Go to the Recognized0 folder and open the Root folder. You can find all deleted data from the hard drive under this folder.
Raw Files
This folder sorts recovered data by file type. If you want to recover specific file types, checking the Raw Files folder can give you faster results. But if you want to get all files back, use the Recognized0 folder.
Recovery Process
After you select the folders you want to recover, start the process with the RGH button. In the window that opens, choose the directory where the recovered files will be saved.
Important Warning
Do not save recovered files to the hard drive you recovered them from. Always save all files to another disk. Saving files to the same disk can change the disk surface and damage the recovered files. Saving to another disk protects the disk surface and prevents file damage. That gives you lossless data recovery.
Reminder
If the power goes out during the scan, you do not need to scan again. The recovery template you saved earlier lets the process continue from where it stopped. In this case, click the Drive button in the top menu. In the tab that opens, choose Open Scan Information. Then go to the directory that holds the recovery template in the browse window and select the file.
This file is usually in the Documents/R-TT/R-Studio/ directory. Click the Open button to quickly open the scan you started earlier and continue from where it stopped.