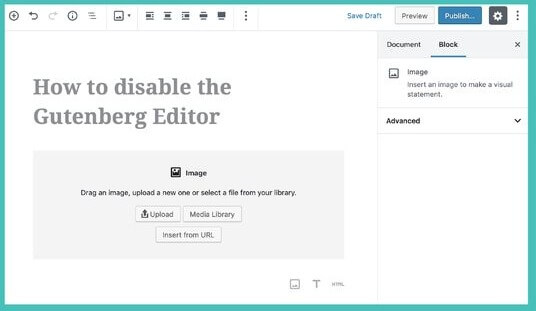
Do the Gutenberg Blocks cause my website to load more slowly
Do the Gutenberg Blocks cause my website to load more slowly?
You may restore the original admin panel by disabling the Gutenberg plugin, which removes the blocks that are part of the WordPress system. The WordPress system incorporates Gutenberg Blocks, a significant content editing tool that gives the traditional admin panel a more contemporary appearance. But all WordPress users, including me, suffered for years from the Gutenberg Blocks, a completely different design from the standard panel layout.
There was a separate text box for the page header, a separate text box for the content body, and separate text boxes for other tools in the basic content editing area. It was simple for us to produce content with this panel arrangement. But since Gutenberg, this area of writing has evolved into something really unique.
Additionally, I’m removing the Gutenberg Blocks from my own website using this plugin. Please make advantage of it as well. It may be preferable for you to acclimate to this new version of WordPress without installing a plugin associated with the Gutenberg Blocks if you are a novice user. Since this is how WordPress’s content editing panel will stay going forward. However, you can take out the Gutenberg Blocks if, like me, you prefer to have a user-friendly panel.
Download disable Gutenberg plugin
Pros:
- Reduces the server load that the blocks add.
- Removes unnecessary code from the HTML output.
- Enables you to use an easy-to-use content panel (opens an Admin panel previous to WordPress 5.0).
Cons:
- We can’t take advantage of the blocks.
- You need to know how to encode to edit into blocks in the content layout.
- Because we installed another plugin to the WordPress panel, it causes more server resources to be consumed (but I think it’s worth it. Because the code that the Gutenberg Blocks add is actually consuming a lot of resources).
When the Gutenberg Blocks were included in the WordPress panel. Since then, it has been millions of WordPress users who have not been accustomed to the blocks. The feature that makes these blocks difficult and unpleasant is that they put the text boxes together and combine the separate layout into a single white page. It was quite confusing to see which object would be attached to.
We had to look where many of the features, like image adding, video uploading, title writing, custom field adding. Because everything has changed its place, and believe it has a designally complex arrangement.
Disable Gutenberg Blocks
How to use Disable Gutenberg Blocks?
For all these reasons, the number of downloads of a plugin on WordPress’s Plugins page began to rise rapidly. Disable Gutenberg. This plugin has reached 600,000 people in just a year since the Gutenberg Blocks were added to WordPress. The reason why the plugin was uncovered was the change in the usual layout of the WordPress panel. Habits aren’t easy to get rid of.
So if you want to make content easier on your WordPress site, I suggest you install this plugin. What should I do after installing the plugin? How do I set the settings? I’d like to go into it in detail to answer a lot of questions. Let’s start by installing the plugin.
How to install the plugin?
Method 1: After installing the plugin, open the Plugins window in the WordPress panel. Open the Load Plugin button above.
Select the path from the scan button and disable-gutenberg downloaded to the Downloads folder or to the Desktop.Add the 2.2.zip file and press the Install Now button.
Method 2: You can start downloading the plugin page in the WordPress panel by typing the keyword “Disable Gutenberg” and then selecting “Setup Now”.
After this phase, we’ve installed the plugin that blocks the Gutenberg Blocks. So how does this plugin work?
Settings of the Disable Gutenberg Plugin
There are two checkboxes on the Settings page. By default, these two checkboxes are active (selected).
1- Disable Gutenberg everywhere
2- Disable “Try Gutenberg” nag
You do not need to change the settings in this plugin. Because the first option is to shut down the Gutenberg Blocks on the WordPress panel. The second is to remove the code of the Gutenberg Blocks from the Website codes. So both checkboxes have to be saved as selected.
Besides these, we have the chance to change other detailed settings for different purposes. So where do we do it and how?
Advanced Settings:
There are two prominent options in the plugin’s settings window. But if you look carefully, you’ll see that there’s actually a connection that shows more options.
We see a link to the word below the More Tools header on the window. This connection opens a window where we can make a lot of settings.
In this window, you can edit all the settings of the plugin. Those who don’t know the settings may be confused, especially because it’s in English. So I’d like to sort in headings what the settings are for:
Disable Nag setting:
Removes the HTML code that has been added to the pages within the website so that the Gutenberg Blog can work. (This setting must be pressed.)
Enable Frontend Settings:
Enables you to activate the Styles that come with the Gutenberg Blocks. (There’s no point in activating this if you’re not using the block layout.)
Whitelist Options setting:
While Gutenberg blocks remain closed on all Text and Pages, it opens additional configuration boxes that you can enable on some of the desired Text or Pages. When you select Tiki, three new text boxes are opened right at the top.
The tasks of text boxes are:
Whitelist Post IDs setting:
When you add the ID number of the font or pages that you want to be active to this text box, only the blocks will work for them. Blocks are disabled on all other Text and Pages. You can enable Blocks for a large number of fonts by adding a comma (,) between each ID number. (It doesn’t matter if there’s a gap between the virgins.)
Whitelist Post Slugs setting:
This text box is used to enable Blocks for passing words in the URL section instead of the ID number, as an alternative to the top. For example, you can enable Blocks for all pages and posts that have the word “ema” in the URLs of all articles on your website. Here again, you can multiply the number of words by putting a comma between each word, as above.
This setting may provide the advantage of enabling collective Blocks for pages dedicated to a single topic. For example, you might want to enable all pages in the “My Pictures” category to display images in blocks.
Whitelist Post Titles:
This text box, as an alternative to the above, activates the Blocks by using the words in the font headers. For example, on pages with the word “Our services” in the font headers, type this word into the text box to open Blocks. For more, we have to separate the words from the comma again.
Watch out!
You don’t have to configure all the text boxes… Just select and save the one that’s useful to you. If both of them work at once or if Three works at once, you can, of course, choose them.
Plugin Menu Item: allows you to hide the Disable Gutenberg link added in the Menubar on the left of the WordPress Panel.
(I think it’s pretty unnecessary to do that. Because one day when you want to change the settings, you’ll say, “Where were these Gutenberg settings?” Leave the checkbox empty. Don’t hold him.)
Menu Item:
Like the previous one, it hides the plugin menu link, but this only allows you to do a hide for versions prior to WordPress 5.0.
Display Edit Links:
Opens the button on pages where Gutenberg Blocks are active, allowing you to switch between the Classic/Block version in the Text Editor. So if you need a Block layout while editing a font, you select the button that’s on there. This moves the text editing page to the Block layout. Or once again, you switch to the Classic WordPress layout.
However! this setting only applies to posts and pages that you add an ID number to the Whitelist Options text box I mentioned in the above settings. If you have not added an ID to the text boxes in Whitelist Options, this button will not be displayed. Similarly, it does not appear in newly added text or pages. For it to appear, you must fill in an ID number or one of the fields in which we add a word in the title word or URL, such as in other settings.
The location of the button opens with the Block Circulation icon at the top of the page in the Block layout. You can see the button there. Similarly, you can switch to the classic order.
This feature varies only in the text editing area. The other sections remain the same. Therefore, if you want to return to the completely classic order, you need to remove the ID number you have added to the Whitelist Options field. If you want to switch from the classic layout to the Block layout, you can see that there is a switching connection at the bottom of the Browser window. Complete the transition to Block layout with the document word there.
ACF Support:
This setting allows you to open a Meta box for private fields. This allows you to use the Block layout in the Private fields. However, if you do not have a server because it will consume too much resources, I suggest that you disable this setting.
Reset Options: This setting allows the plugin to reset the settings that you accidentally or deliberately changed to the default settings.