Is your hardware ready for Windows 11? As you probably know, Microsoft officially ended support for Windows 10 on October 14, 2025. Since then, millions of users have been asking themselves whether their computer can actually run Windows 11 and looking for a straight answer. In this article, we’re going to give you just that.
On this page we’re going to walk you through Windows 11’s minimum system requirements, compatibility check tools and what you can do if your hardware is on the older side.
Minimum System Requirements for Windows 11
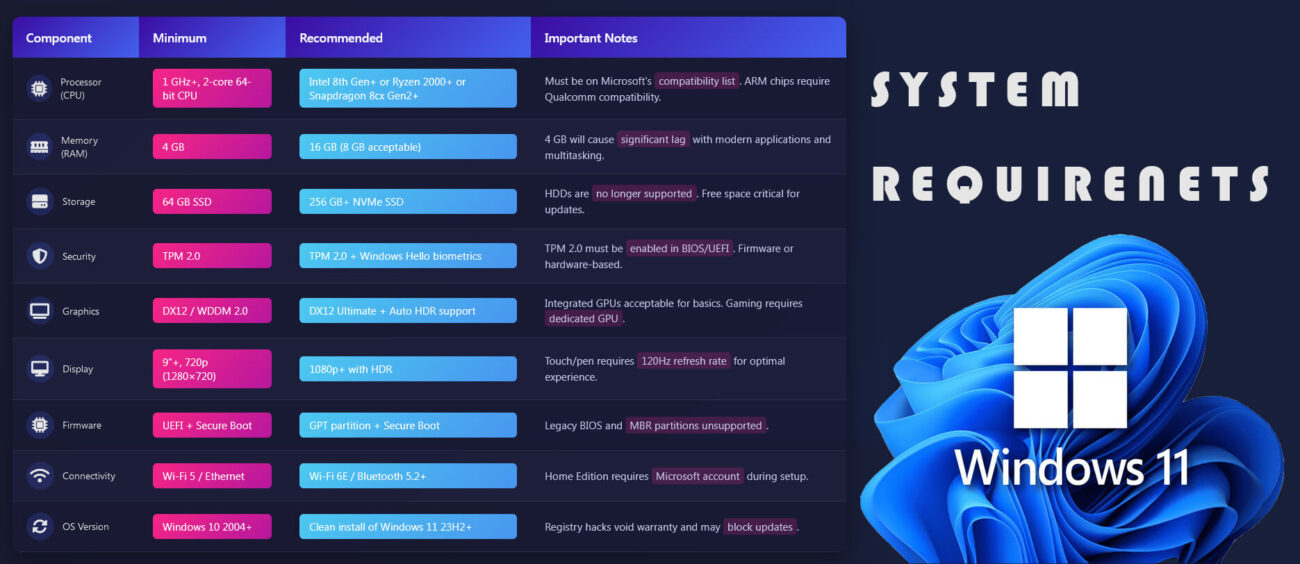
Microsoft set some pretty specific hardware requirements for Windows 11. Your computer needs to meet the following specs:
- Processor: 1 GHz or faster, 64-bit compatible, with at least 2 cores.
- RAM: At least 4 GB.
- Storage: At least 64 GB of free disk space.
- TPM: Trusted Platform Module (TPM) version 2.0.
- Secure Boot: A UEFI-compatible motherboard.
- DirectX: A graphics card that supports DirectX 12 or higher.
- Display: At least 720p resolution, 9 inches or larger.
- Internet connection: Required during setup for a Microsoft account.
The TPM 2.0 requirement.
Without a doubt the most controversial and frustrating requirement for longtime users is TPM 2.0. Because this new piece of hardware that gets thrown in the face of anyone trying to upgrade has essentially forced people whose computers don’t have it to go out and buy a new machine. Now TPM (Trusted Platform Module) is actually a dedicated security chip that either sits physically on the motherboard or is built right into the processor. And honestly it’s pretty necessary. Its job is to securely store encryption keys, passwords, digital certificates and biometric data like fingerprints. Completely isolated from the operating system and any software running on top of it. That’s a big deal and yeah, it should be there.
For example even if malware manages to sneak into your computer, it still can’t get to the data inside the TPM chip. On top of that TPM also monitors the boot process. It compares the system against its previously trusted state so it can detect if anything was tampered with or changed during startup. And that’s exactly why Windows 11 made this chip mandatory.
On top of all that security features like BitLocker disk encryption, Windows Hello biometric login and Secure Boot all rely directly on TPM 2.0 under the hood. The older standard TPM 1.2, was developed back in 2003 and doesn’t fully support today’s encryption algorithms. TPM 2.0 on the other hand, brings stronger algorithms, a more flexible architecture and way more comprehensive protection against modern cyber threats. Bottom line TPM 2.0 isn’t just some checkbox requirement for Windows 11. It’s the backbone of the whole system’s security architecture.
Here’s how to check whether you have TPM 2.0:
- Press Windows + R on your keyboard.
- Type tpm.msc and hit Enter.
- In the window that opens, you can see your TPM version.

If you’re getting a “TPM not found” error, you may need to enable it from your BIOS/UEFI settings. On Intel systems this feature goes by “Intel PTT” and on AMD systems it’s called “AMD fTPM”.
So, how do you update your BIOS? (ASUS, MSI, Gigabyte)
A lot of motherboard manufacturers (like ASUS, MSI, Gigabyte, etc.) introduce TPM 2.0 support through BIOS updates that get added later on. So the first thing you need to do is follow the steps below based on your motherboard brand.
But before you do anything, you need to find out your motherboard model. To do that, type msinfo32 into the Windows search bar and hit Enter. Look at the window that opens. The Baseboard Product line in there will give you your motherboard model. After that, do the BIOS update according to whichever of the motherboards below is yours.
Step by Step …
1 – Format the USB drive as FAT32. To do that:
Find the USB in the window that opens when you click on the Computer icon and follow these steps: Right-click the USB → Format → File system: FAT32 → Start
Note: It’s not absolutely required that the USB be empty, but keeping it clean is safer. So just add the BIOS package you’ll be downloading — that’s enough.
2 – Download the BIOS File.
- Go to the support page of whichever one — ASUS, MSI or Gigabyte, is your motherboard.
- Search for your motherboard model.
- Click on the BIOS tab.
- Download the top one (the most recent version).
- On top of that, also download the EZ Flash tool for ASUS, M-Flash for MSI and Q-Flash for Gigabyte. Like I said… whichever motherboard is yours, you’re only downloading the file that belongs to that one!
- Open the downloaded .zip file and copy the file that comes out of it directly into the USB FLASH drive (not inside any other folder)
3 – Open the Flash Tool.
Restart your computer. On the startup screen:
- Press DEL to enter the BIOS.
- Inside the BIOS, press F8 → the Flash software you downloaded will open automatically.
4 – Run the Update.
When Flash opens, select the Update BIOS option. You should see the USB there — click on it, select the setup file inside it. Confirm it and wait for the process to finish. It can take around 5-10 minutes, so make sure you wait it out. Whatever you do, do NOT turn off the computer during this time and absolutely do not pull out the USB either!..
5 – Done.
Once the update is complete the system will restart automatically. Then go into the BIOS, set the AMD fTPM or Intel PTT option to Enabled and save with F10. That’s all there is to it.. If you have trouble getting through these steps, you can also check out related videos on YouTube.
After you finish the BIOS update, restart your system. Then go into your BIOS settings (usually by pressing DEL or F2 during startup) and find the Intel PTT option for Intel systems, or AMD fTPM for AMD systems, and set it to Enabled. After that, save and exit with F10. Finally, in Windows, press Windows + R, type tpm.msc, and see that TPM 2.0 is now recognized.
Which processors are supported for Windows 11?
Microsoft has limited Windows 11 installation to only certain processor generations and newer. When this decision was announced, it caused a huge controversy and directly affected millions of users in a bad way.
When it comes to Intel processors Microsoft officially supports only 8th generation Coffee Lake and later. What that means is that 7th gen Kaby Lake processors like the Intel Core i7-7700, i5-7600 or i3-7100 released in 2017 and still running perfectly fine are considered insufficient for Windows 11. And yet these processors are still more than capable for everyday use. Microsoft’s main justification for drawing the line at 8th gen is that those chips and beyond offer stronger security instructions, better virtualization support and a more TPM 2.0-friendly architecture.
On the AMD side the minimum supported threshold is the Ryzen 3000 series and above, based on Zen 2 architecture. There’s an important catch here. The Ryzen 2000 series is built on Zen+ architecture and Microsoft left it off the supported list. So a capable 2018-era chip like the AMD Ryzen 7 2700X, powerful as it is doesn’t meet Windows 11’s official requirements. Part of the reason is the security improvements that came with Zen 2 and part of it is that AMD’s fTPM (firmware TPM) support became much more stable starting with Zen 2. Of course, most AMD users have no idea about any of this. But they weren’t the only ones left out. Qualcomm users got caught up in this mess too.
On the Qualcomm side Snapdragon 850 and above are supported. This category covers mostly thin and light laptops running ARM architecture. Qualcomm’s Windows 11 support has really moved into the spotlight especially with the Copilot+ PC concept. Newer chips like the Snapdragon X Elite can fully take advantage of Windows 11’s AI-powered features.
So why did Microsoft want this change in the first place?
According to the official statement the decision is entirely focused on reliability and security. Microsoft had claimed that supported processors experience a crash-free rate of 99.8% on Windows 11 and that older generations couldn’t meet that stability threshold. Critics didn’t find that reasoning convincing enough and argued there was a commercial motive in the background, essentially to drive hardware upgrade sales. That debate got even more heated when some researchers suggested these restrictions had more to do with marketing strategy than any actual technical necessity.
So if your computer has something like an Intel 7th gen or AMD Ryzen 2000 series processor, the official upgrade path is simply not available to you.
But what if I told you there’s a way to find out whether your PC is good enough to run Windows 11? The PC Health Check Tool is honestly the most practical tool out there for this. Definitely worth a look.
Finding out Windows 11 compatibility with the PC Health Check Tool.
Microsoft’s PC Health Check app figures out in one click whether your system is compatible with Windows 11.
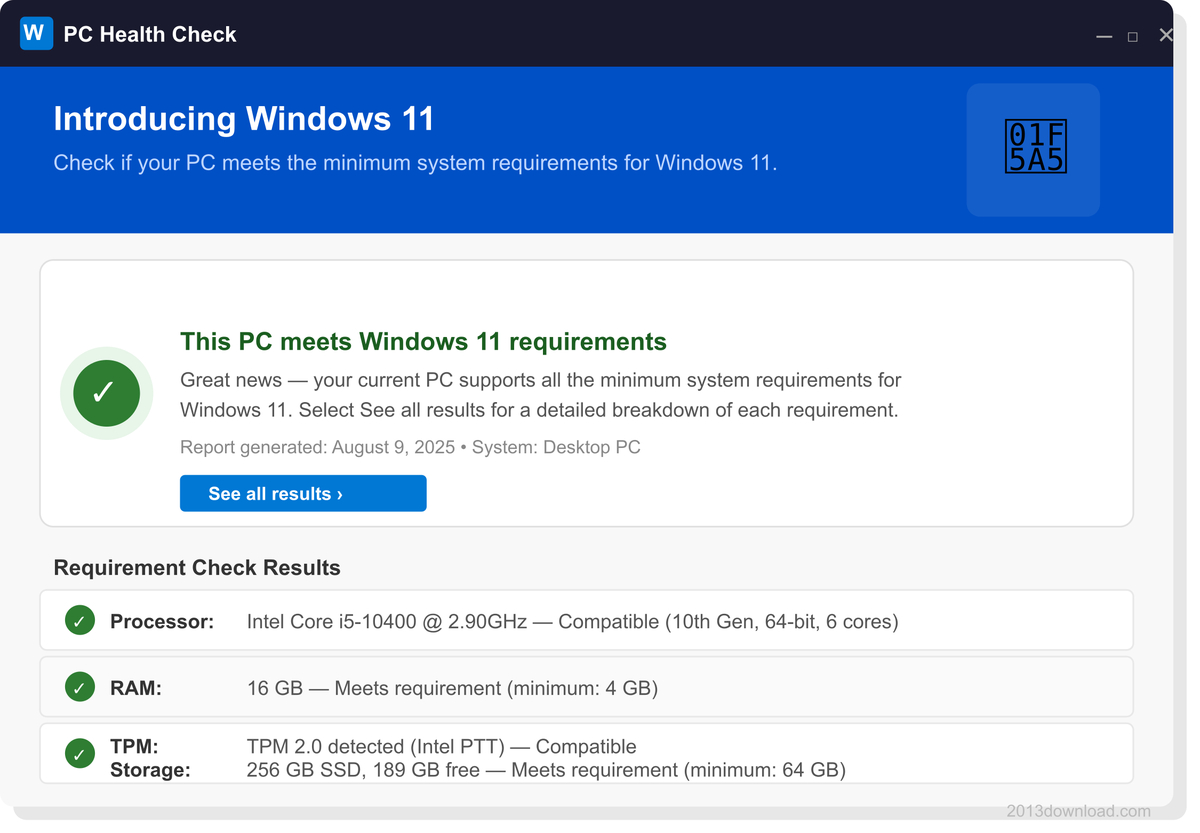
How does it work?
- Download the PC Health Check app from Microsoft’s official website.
- Install it and run it.
- Click the “Check Now” button.
- The app will list out any incompatible components.
That’s it! After that, you can buy a compatible replacement part, swap it in and go ahead with the upgrade. This is the most cost-effective approach out there and I’d recommend it.
Other ways to check if your hardware is incompatible.
1. Update your BIOS
On some motherboards TPM 2.0 support can be added through a BIOS update.
If your computer physically has a TPM 2.0 chip but you’re still getting a “TPM not found” or “TPM 1.2” error during the Windows 11 compatibility check. Don’t panic. The first thing you should do is update your BIOS. Some motherboard manufacturers ship with TPM 2.0 disabled by default or an older BIOS version might mean the feature just isn’t active on your system yet. On Intel-based systems this shows up in the BIOS menu as Intel PTT (Platform Trust Technology) and on AMD-based systems it’s AMD fTPM (Firmware TPM). These options let the processor handle TPM 2.0 functionality in firmware, without needing a separate physical TPM chip.
To update your BIOS, you’ll first need to know your motherboard’s brand and model. You can find that easily with a free tool like CPU-Z or by running the msinfo32 command directly. Then head over to the official support pages for ASUS, MSI, Gigabyte, ASRock or whatever brand you’ve got, search your motherboard’s model number and download the latest BIOS version.
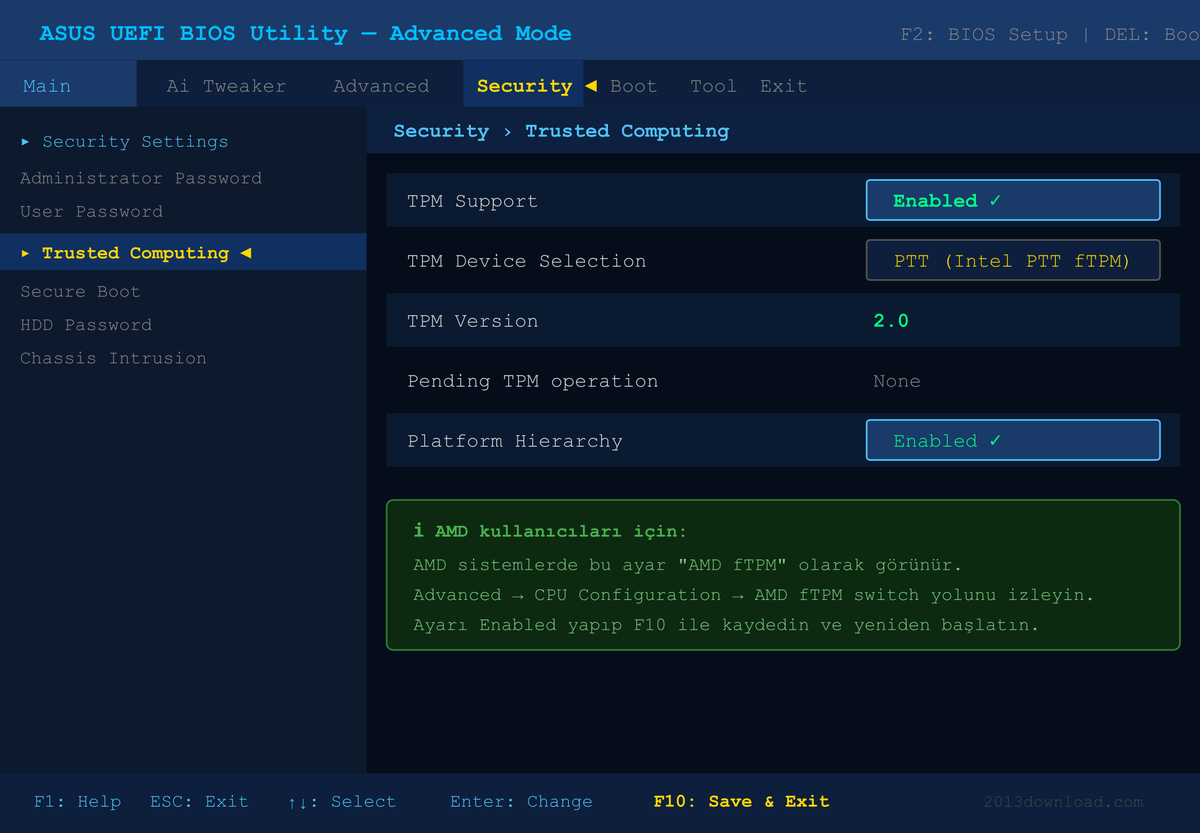
After you’ve finished the BIOS update, restart your system. Then go back into BIOS settings and set Intel PTT or AMD fTPM to Enabled. After that run the tpm.msc tool in Windows again to verify that TPM 2.0 is now being recognized. Because these simple steps have allowed thousands of users to make the jump to Windows 11 without buying new hardware.
2. Enable Secure Boot
Go into your BIOS/UEFI settings and turn on the Secure Boot option. It’s usually found under the “Boot” or “Security” menu. I won’t go into detail on this one since it’s a pretty straightforward toggle to flip.
If you really do need a hardware upgrade, what should you look at first?
Hardware to check first:
If your system is incompatible and you’re thinking about upgrading, here’s the priority order:
- RAM: If you’re under 4 GB bump it up to at least 8 GB. (Useless if your motherboard doesn’t support it.)
- SSD: If you’re still running an HDD switch to an SSD. It’ll boost performance and make the installation process a lot smoother.
- Motherboard + Processor: This is the last thing you should look at. But if you need TPM 2.0 support, this is what you’ll have to tackle.
If you’ve gone through the solutions above one by one, you’ll now have a pretty clear answer to the question, is your hardware ready for Windows 11? But if you ask me, you can keep going with your old hardware for a while longer. You don’t need to rush out and wipe your OS to install a new one. That said if you’re dead set on making the switch to Windows 11, the right move is to do it alongside new hardware. Not try to force it onto old gear. Keep that in mind. That’s my last piece of advice.