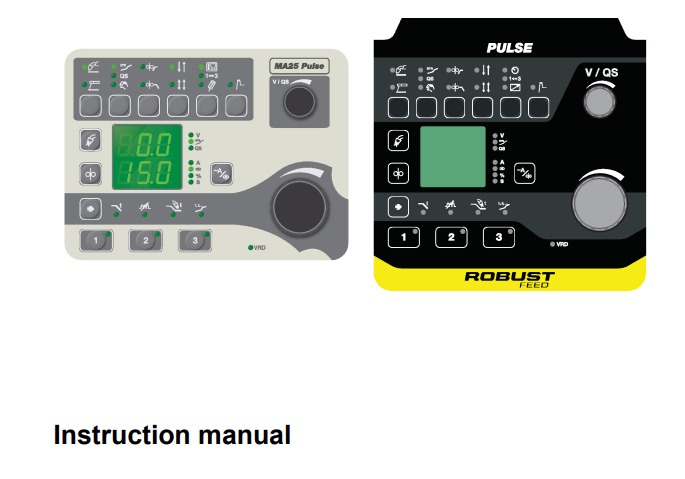
The ma25 pulse is a portable digital screening audiometer used for assessing hearing health. It is a product from the german technology giant maico and is designed primarily for situations where a fast and a reliable hearing test is needed, such as schools, occupational health centers, and family practices. The device main goal is to make a preliminary diagnosis of hearing loss by testing individuals hearing at different frequencies.
How it works?
ma25 pulse applies an air conduction hearing test method. The audiometer presents sound to the subject at certain frequencies (usually between 125 hz and 8000 hz) and at various intensities (decibel levels). The word “pulse” in its title signifies the ability to release the test sounds as intermittent pulses; this feature helps tinnitus sufferers to recognize the test tone. Its compact, battery-powered unit makes it possible for the professional to perform the hearing screening wherever they want without the limitation of a clinical setting.
- Upload Date: June 19, 2024, 15:28
- File Name: MA25-Pulse.pdf
- File Type: PDF
- File Size: 458 KB
What do we find in the user manual?
The user manual is a comprehensive guide containing all the technical and practical information necessary for a safe and correct measurement process. In brief, you will experience the following topics:
- Setup and preparation: the correct way to put on the headphones and how to work the device through batteries or a power adapter.
- Test functions: information on the usage of manual or automatic test modes and the changes of frequency and decibel settings.
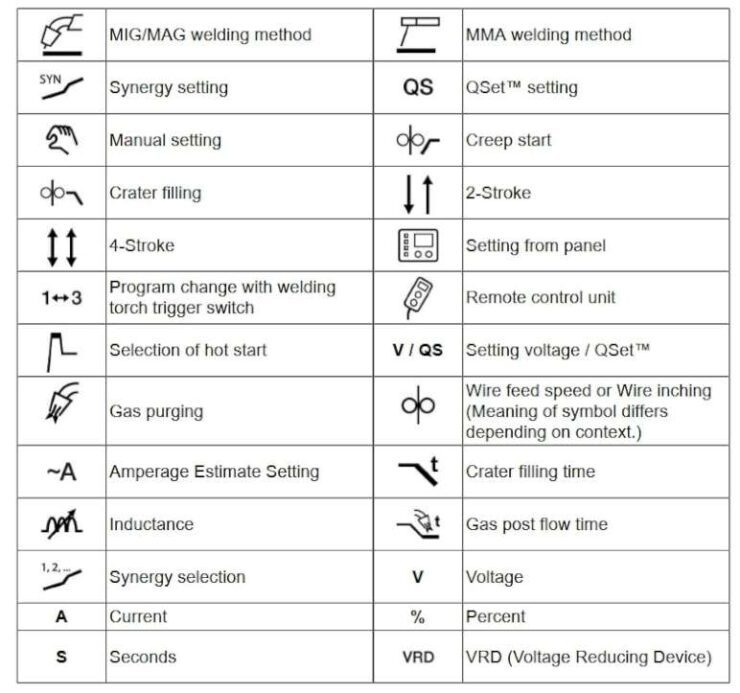
- Symbol guide: a description of the on-screen warnings and measurement values.
- Maintenance and calibration: requiring hygienic cleaning and yearly calibration for extending the measuring accuracy.
- Error codes: help for possible hardware breakdowns and battery replacement notices.
All the information concerning the use, repair, or assembly of the ma25 pulse welding machine can be found in this manual. You have an option to download this guide directly or read more detailed descriptions on our website. Either way, you will get the information you want. You can also download it as a pdf by clicking the button below or continue reading here.
We are now going to review the detailed descriptions of the ma25 pulse manual.
What are the safety and compliance measures?
Safety precautions for the ma25 pulse device.
One of the essential moves in using the ma25 pulse welding machine safety is its proper grounding. Connection the grounding terminal on the machine directly to the grounding system ensures no electrical leakage and no static electricity buildup. At the same time, your grounding cable must be insulated, corrosion-resistant, and have a cross-section consistent with the machine. Make sure your working area is not wet; in case the room is damp, set up some extra insulation. The above steps drastically lower the risk of getting an electric shock.
Ensure that the power supply voltage conforms the machine’s requirements, such as 220v/50hz, before switching the machine on. To avoid overloading, it is necessary to always utilize a fuse or a circuit breaker together with the machine.
Protective equipment and personal safety.
The welder should wear PPE, the personal protective equipment, while the welding is in process. Namely, this means usage of an auto-darkening welding mask, which gives protection against uv/ir rays, besides that, the welder should put on flame-resistant gloves and working clothes to be safe from getting burnt.
Wear work boots, which are closed-toed, cover the ankles, and can resist molten metal splashes. Definitely, do not wear open shoes.
Ventilating your work area is a great measure against gases building up. Besides that, we advise the utilization of respirators to dodge inhalation of welding fumes. In addition, keep a fire extinguisher at hand for lessening the fire risk and move flammable materials if needed away from the welding region.
All of these are fundamental requirements specified in the ma25 manual for both your safety and the environment. Be sure to abide by the rules with your utmost attention.
Which electrodes, wires, or gases are compatible?
The ma25 welding unit is purposed for mig/mag welding and is capable of welding with any of the four types of solid wire electrodes without any problem. Wires in the diameter of 0.6 mm to 1.2 mm are a wise choice if one wants to get the best results in stainless steel, carbon steel, or aluminum.
As an example, er308/308lsi wires are the perfect ones when welding stainless steel, whereas er4043/5356 wires are the best choice for aluminum. With the aid of the pulsing feature, welds are made cleanly and with minimal spatter. In addition, you may use wire that is flux-cored, but you have to manually turn off the gas and change the settings if you do this. The right electrode specification should depend on the thickness of the material, the position of welding, and the current range of the machine. If not, the outcome of your welding may be what you least expect.
Gas compatibility and the recommended mixtures.
The welding machine is compatible with argon, helium, and co_2-based mixtures for gas-shielded mig/mag welding. If you happen to be welding stainless steel, then argon with 2-5% co_2 or argon with 5-10% helium would be fine options.
Only argon is needed for aluminum. As for carbon steels, 75% argon and 25% co_2 mixture is best for the purpose of both saving money and getting deep penetration. Gas flow should be adjusted to 15-20 liters per minute according to the thickness of the material, and it is equally important to keep the gas nozzle free of dirt. Besides that, make sure there are no leaks at the gas cylinder connections, and set the pressure regulator as directed in the manual. These seemingly minor things make a big difference in the final quality of your welds.
Does it have certifications like ce or ul?
The ma25 pulse welding machine is marked with the ce mark required for its trade and usage in the member countries of the european union. This means the product adheres to the rules of electromagnetic compatibility (emc), the low voltage directive (lvd), and other main health and safety regulations. The ce mark is proof that the product meets the standards of the european market and is safe for the user. Nonetheless, it is worth pointing out that ce is, in some cases, based on the manufacturer’s own declaration, which implies that technical files may have been inspected by authorities.
The issue of ul certification, on the other hand, is contingent upon the manufacturer’s intended market. Ul (underwriters laboratories) is a certification that is widely accepted mainly in the north american area and is a sign that the product has been put through tests that expose it to different hazards such as fire or electric shocks. In case the ma25 is ul-certified, you will probably find this information in the “declaration of conformity” section of the manual or on the product tags. Consequently, it is best to ask the manufacturer or seller to provide you with the certification before placing an order.
How to set up the machine (voltage settings, connections)?
First thing in the process of setting up the ma25 pulse welding machine is checking the voltage. Operating voltage of this machine is either 220v or 380v, so make sure that your power supply is the same as that which is indicated on the label (for example, 220V/50hz). If the voltage does not match, a voltage regulator might be a solution to the problem. Then, connect the grounding cable to the rear terminal firmly and attach the grounding clamp to a metal part of your workpiece. Also, ensure that the polarities (+/-) of the welding cables (for the mig/mag torch) are right and that the wires are not damaged.
Gas and wire feed connections.
One of the most important things is the connection of the gas and wire feed. Start by attaching the shielding gas cylinder to the machine’s gas inlet by a pressure regulator and make sure it does not leak. For instance, when you weld aluminum using pure argon, the gas flow should be set to 15-20 liters per minute. The wire feed unit should be adjusted as per the wire size that you will use (for example 0.8-1.2 mm) and wire tension should be brought to the right level. After the machine has been powered, choose the pulse mode and current levels by consulting the tables in the manual. When all connections are done and settings are finished, do a test weld to check if it working properly.
What are the installation and technical specifications?
Technical details: input voltage, power consumption, duty cycle?
The ma25 pulse welding machine is working on 220-240v single-phase or 380v three-phase ac power. You have to make sure that the input voltage is the same as it is given on the label or in the manual (with a tolerance of about 10%). Power consumption varies from 5-8 kw depending on the maximum output current such as 250a. Besides that, it is very energy-efficient, meaning that it does not consume power when idle.
The duty cycle shows how long the machine can be used continuously. A 40% duty cycle, for instance, means that, within 10 mins, you can weld with the machine at full power for 4 minutes and then it has to cool down for 6 minutes. However, you should always keep in mind that this ratio will go down if high current is used. So, on heavy-duty works, you have to take breaks to let the machine cool down.
Keeping an eye on the duty cycle is very important if you want good welds. The device might overheat and switch off if you work on thick materials for a long time and push it to the limit. Fortunately, thermal protection is part of the ma25 design and can help out in such a situation.
Power usage and duty cycle may also be dependent on the surrounding temperature and air supply, so it is advisable to follow the tables in the manual. All technical specifications can be found either on product labels or the technical data sheet (tds).
Can it work with a generator?
Certainly, the ma25 pulse welding machine can operate with a generator, but it needs to satisfy a few conditions. The most important thing is that the generator provides a stable voltage and meets the machine’s input requirements (220-240v or 380v). Moreover, the power of the generator should be more than the maximum power of the machine, i.e. 5-8 kw.
One quick tip: generators with inverter technology are preferable, as they handle the current changes caused by welding in a much better manner. Less expensive generators can be the reason for voltage drops or frequency problems, which not only result in performance degradation but also at times in breakdowns.
Points to consider when using a generator.
First of all, the generator should be correctly grounded and proper work can be done by using thick and short cables to connect it to ma25; on the other hand, long cables can bring about power loss and efficiency decrease. Make use of the generator in an open area where there is fresh air so that the generator does not get too hot. A trial at low current will help see whether the generator can work with the machine you are using before starting to weld. Besides, have a look at the manual for any recommended generator models; if there arent any, get in touch with the technical support. These steps put you out of danger and ensure the best performance.
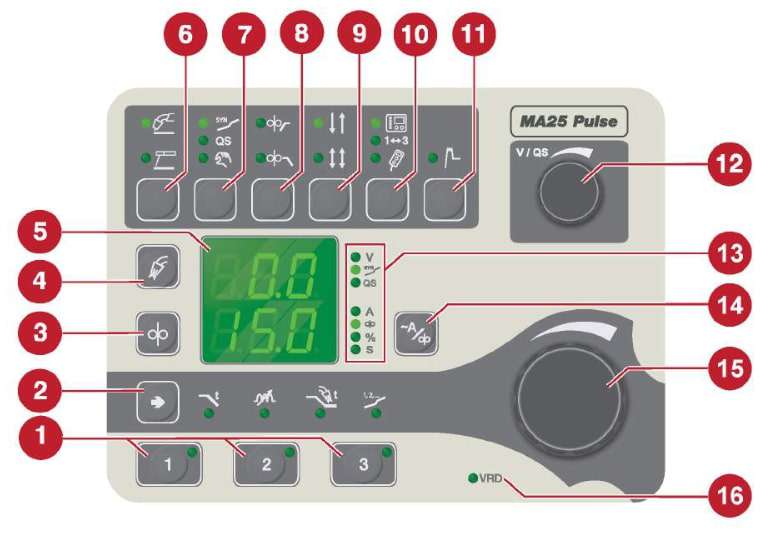
How are the usage and settings?
Basic operating steps: on/off, amperage/pulse settings.
In operating the ma25 pulse welding machine, first check that all the connections for power, grounding, gas, and wire feed are in place. The main power button will show the screen light up with the voltage and the ready mode when pressed. Adjust the current to the material thickness before welding; for instance, you can use 70-90a for 1 mm of stainless steel. On the dial or panel, you can also switch to pulse mode, which gives you more control, especially if youre working with aluminum or thin metals. Change the frequency and the width of the pulse depending on your welding speed and the depth of the penetration that you need. With this, you are not only working in an effective way but also in a safe way.
Testing settings and shutting down.
After setting everything, you should try them out firstly on a scrap piece of metal. By doing this, you can make sure that the wire feed and the gas flow are what you have set and that they are correct. After the welding job, it is time to turn off the system in a safe way. Firstly, turn off the wire feed and the gas valve and then the power button. If you want to set the pulse parameters back or factory settings, simply go to the panel and press the reset function. In the meantime, working with the manual tables of materials, current, and pulse conditions leads not only to safety but also better weld quality.
How to use pulse mode and what are its advantages?
Activation of pulse mode requires only one simple step which involves pressing a button on the digital panel. The next thing to do is to adjust the frequency of the pulse (usually somewhere between 1 and 200hz) and the width of the pulse (the points of high and low current) based on the welding method and material thickness. When presented with the task of welding aluminum of low thickness, one should choose a frequency of around 100-150hz and keep the peak current at a low level; on the other hand, if you are going to weld a thick stainless steel, use wider pulses. Besides this, mode pulse automatically coordinates with the wire feed, thus giving you the most extended welds, which saves you time, and gives more control over the process.
Advantages:
With Pulse mode by your side, spatter is significantly lessened and deeper penetration is achievable compared to regular mig/mag welding. In addition to this, the probability of thin material burning through or warping becomes almost negligible, and on top of that, the controlling of vertical or overhead welds becomes simpler. Along with this, the energy usage is at the higher end of the scale, and the finish is a smooth weld bead, thus making it perfect for the works where the attraction of the piece is of high importance. Most noteworthy of all, it does not emit oxygen to the metal surface that is sensitive such as aluminum. All these factors make the ma25 the go-to machine for the job, be it a big industrial job or a tiny detail.
Optimum settings for different materials: stainless steel, aluminum.
Starting a welder with a mi25 pulse on stainless steel prolongs from 70-160a the current and from 1-2hz the pulse frequency. The wires you choose should be er308l or er316l, while the gas mixture is 98% argon – 2% co_2 depending on the material grade. At this setting least spatter occurs and the weld is held strong while the corrosion resistance is not compromised. With the help of current and the pulse width, you can make it a little bit thicker; however, only 30-40% should be the duty cycle, so the environment does not get too hot.
As far as aluminum is concerned, ac pulse mode should be switched on and the current should be set somewhere between 80 and 180a. Managing the heat may also mean setting the pulse frequency somewhere between 50 and 150hz. The reason for the er4043 or er5356 wires is that, used in combination with pure argon at the rate of 18-22 l/min, they will allow for the removal of the oxide layer and a clean weld. Since aluminum is a fast heater, you must also feed the wire at a faster rate than usual and ensure that the torch is always at the same distance from the workpiece. In fact, you can use the ma25 synergetic programs, which will do everything for you, and your job will be done in no time.
What are the maintenance and troubleshooting steps?
Periodic maintenance requirements: cleaning, filter replacement.
Ma25 pulse welding machine must undergo periodic maintenance including:
weekly cleaning and monthly checking. To do a cleaning, inside and outside should be wiped with compressed air or a dry cloth in order to avoid the accumulation of dust and metal particles. Cleaning the residues in the wire feed unit is also a part of the daily routine. After that, replace or clean the air filters that have been used for 3-6 months. Apart from that, clean the gas nozzle and the contact tip by removing welding spatter. And if they are worn, then replace them. At last, check the welding cables as well as the connection points for any oxidation. By following this schedule, you will not encounter sudden breakdowns, and the device will keep its highest performance level.
Filter replacement and lubrication.
Make sure that you do not forget the air facility and the dust filter of the cooling fan and that of the electronic board, because if you do, they will be dusty and will cause you problems. If the filters become clogged, performance drops, or overheating occurs. Additionally, every six months lubricate the gears on the wire feed motor with high-temperature grease. After the service, do a quick test weld to confirm the normal operation. And always keep up with maintenance from the manual. This different maintenance will continue the life of your machine and keep it efficient.
Common problems: no arc, overheating, and the solutions.
Failing to create an arc is basically caused by a bad ground connection, loose connections, or a wire that is not in contact with the workpiece. Solutions are usually involving better thorough cleaning of the ground clamp and tightening it, checking the wire feed operation, and making sure the gas supply is on. Overheating, instead of that, can be the result of the user pushing the duty cycle beyond the limit, blocked ventilation holes, or a hot environment. Cool down the machine by giving it some rest, clean the fan and the air path, and cool down the room.
Gas leaks, irregular wire feed, and messy beads are some of the other problems that may accompany like. Recheck the hose seals for leaks and adjust the wire tension if necessary. If these actions are not helping then consult the error codes in the manual for a quick solution. Not only will these steps make different things work better, but they will also contribute to longer machine life.
What is the list of error codes and their meanings?
The error codes most frequently encountered for the ma25 pulse machine are:
- E01: overheating. A good idea to follow here would be to turn off the power and wait for the device to cool down. Also, it is advisable to increase the airflow around the device.
- E02: low voltage. First, ensure that your power source and cables are in good condition.
- E03: gas flow error. Check if the gas cylinder valve, the hose, and the regulator are clean and free of obstruction.
- E04: wire jam. Remove the wire feed path blockage or change the wire if it is old.
- Other codes:
- E05: electronic board failure. Please, a call to the authorized service center only.
- E06: phase error in three-phase models. Kindly check the power supply for the phase balance.
Firstly, these codes appear on the display and the respective solutions can be found in the manual’s troubleshooting section. If the error continues, it is better to call for technical support.

Leave a Reply
You must be logged in to post a comment.